Fashion DIYs are back! With summer holidays I'm having more time for crafts; it's a task that relaxes me a lot so these months you'll see many tutorials to customize your garments and give a second chance to some of the clothes you have forgotten at the bottom of your wardrobe. Let's start with an upcycling of the classic Superga sneakers.
¡Los DIY de moda han vuelto! Con las vacaciones de verano tengo más tiempo para dedicarme a las manualidades; es algo que me relaja y si además el resultado es chulo y se le puede dar uso, pues mejor que mejor. Estos meses vais a poder ver bastantes tutoriales para customizar prendas y poder dar una segunda oportunidad a esas piezas que tenemos olvidadas en el fondo del armario. Empezamos con un lavado de cara a unas clásicas zapatillas Superga que tenía perdidas por casa.

MATERIALS/MATERIALES
- Sneakers / Zapatillas- Cutter
- Scissors / Tijeras
- Felt-tip pen / Rotulador
- Pencil with rubber / Lápiz o bolilápiz con goma
- Acrylic Paint / Pintura acrílica
- Satin ribbon / Cinta de satén

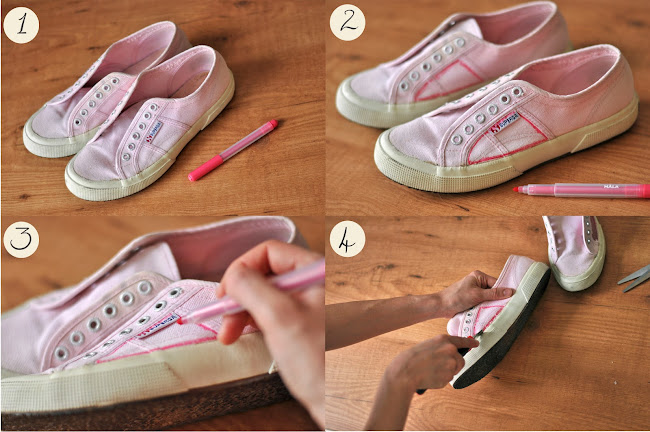
Start by marking with the felt-tip pen the part of the sneaker you want to cut up. I've done it in parts delimited by seams, so the cuts are more defined and less frayed. Do the same pattern in both sneakers. Carefully, start cutting up these parts with the cutter, the scissors can be used to smoothen the cuts.
Empieza marcando con el rotulador las partes de la zapatilla que quieres cortar. Yo lo he hecho partes delimitadas por costuras, de ese modo la zona queda más definida y la tela se deshilacha menos. Haz el mismo dibujo em ambas. Cuidadosamente, empieza a cortar esas partes con el cutter; las tijeras puedes usarlas para pulir los cortes o ayudarte en partes más complicadas.

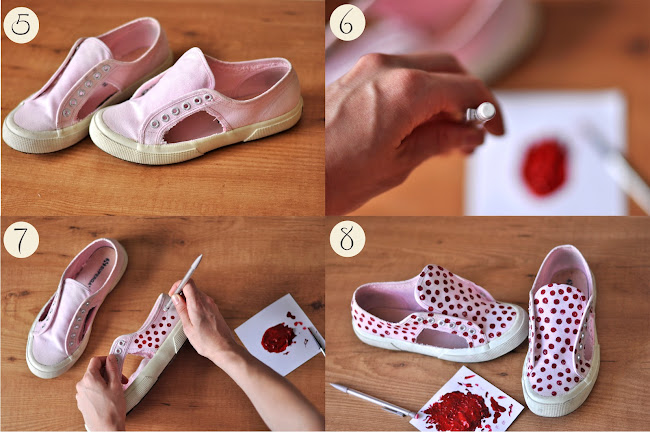
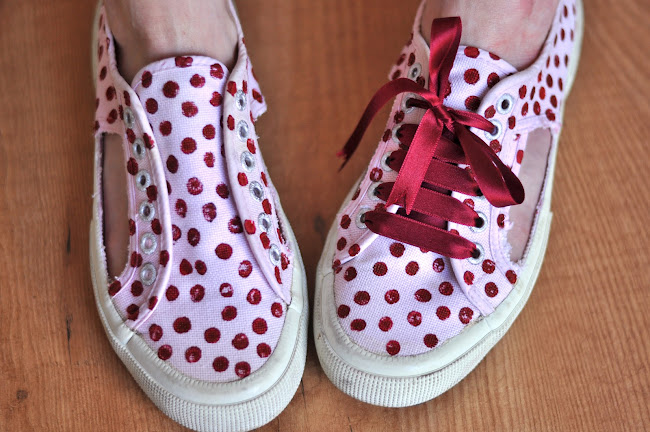
The rubber of the pencil is going to be used as a stamp to create dots all over the sneakers surface. Put some acrylic paint on a plain surface and dab the pencil on it. Now it is all about stamping and stamping again and again untill you gave the pattern you want. From time to time, clean the surface of the rubber to make sure the dots are stamped clearer. As the sneakers are difficult to iron and heat is needed to stick the paint to the fabric, using a hairdryer is a good solution. The final touch is given by using satin ribbons as shoe laces. Do you like the result? I'm loving them!♥
Vamos a usar la goma del lápiz a modo de tampón de estampación con el que iremos creando los lunares. Pn un poco de pintura acrílica en una superfícia plana y ve empapando la goma y estampándola sobre la tela. Es recomendable ir limpiando la goma con un papel de vez en cuando para evitar que se acumule pintura seca y los lunares queden más definidos. El toque final se le puede dar cambiando los típicos cordones por unas cintas de satén. ¿Qué os parecen? A mí me tienen enamorada♥

8 comments
ES IDEAL TU IDEA
BESOS AMOR
NEW WEDNESDAY OUTFIT IN MY BLOG: ESPADRILLES FOR A WALK
http://showroomdegarde.blogspot.com.es/2014/07/espadrilles-for-walk.html
Que bonito!!!! Me encanta tu idea!!
Costa de la Moda
Están preciosas!!! me encanta cómo quedan los lunaritos!
Besos.
Gemeladas
yo tengo unas superga negras a las que le quería hacer algo similar, pero son mortíferas para mis pies. Probaré con unas converse o similares... Besos!
http://modistilladepacotilla.blogspot.com.es
Te han quedado muy originales!
muacarmen.blogspot.com
Que monas!
Que idea tan chula!
Hi nice reading your blogg
Post a Comment