Showing posts with label DIY. Show all posts

Monday 3 October 2011

Geek

La pajarita, esa prenda en un principio tan propia de looks masculinos, me encanta. Llevaba tiempo con ganas de una, así que he aprovechado las perneras del pantalón tejano que corté y personalicé en el DIY que pudisteis ver aquí, y me he hecho la mía propia. Otro DIY que ha salido de la misma prenda. Ya veis lo que me gusta reciclar a mí las cosas, ¡¡si es que se le puede sacar mucho uso a todo!! 
El resultado me ha encantado, con ella puedo transformar cualquier look normalito en uno de autentica empollona. Me he subido a mis cuñas negras para feminizar el conjunto, y ale, me he lanzado a la calle a lucir mi lado más geek. Sí, quizás unas gafas de ver del estilo también hubiesen sido un complemento ideal, pero con el solazo veraniego del que aún estamos disfrutando, me es imposible prescindir de mis gafas de sol, vienen conmigo a todos lados, aunque bueno, las Wayfarer tienen ese puntillo freak también, no?

I love bow ties. I've been wanting one for long, so I've made mine using the spare denim of the jeans I cut to make the tribal shorts I showed you here. You see how much I like recycling things!!
The result of my DIY bow tie couldn't have been better. It can transform any simple look in a geeky one. My wedges are perfect to femenize the whole outfit. Maybe the perfect accessories could have been geek glasses, but the sun is still so bright and I can't go out without my sunglasses, but I think Wayfarer have the freaky touch too, don't you think? 

Camisa/Shirt: Zara(old)
Shorts: Zara (old)
Cuñas/Wedges: H&M
Cinturón/Belt: Blanco (old)
Pajarita/Bow tie: DIY

Monday 19 September 2011

Me, myself and my DIY

La verdad es que poco han durado estos shorts DIY (tutorial aquí)en la percha al día siguiente de acabarlos ya tuve que estrenarlos. ¿A qué son bonitos? Yo ya me estoy imaginando cómo los llevaré este invierno y se me ocurren un montón de ideas.¿Cómo los llevaríais vosotras?

As I told you, here I am with my "tribal" shorts. Aren't they so nice? I'm just thinking about how I'll wear them this winter and I've got a lot of ideas. ¿How would you wear them?


Crochet top: Mango (old)
Shorts: DIY
Botines/Booties: Zara (old)
Bolso/Bag: Massimo Dutti (old)
Pulseras/Bracelets: H&M + DIY(conchitas/shells)


Friday 16 September 2011

DIY: Tribal shorts

Cuando hago limpieza de armario siempre encuentro pantalones que no me acaban de convencer, casi siempre tejanos, porque me encantan y tengo muchos, así que yo siempre los "arreglo" dándoles un tijeretazo y convirtiéndolos en shorts. Claro está, que llega un momento que ves el armario lleno de shorts tejanos que te acaban pareciendo todos prácticamente iguales. Los primeros que me hice, ya años atrás, acabaron llenos de tachuelas, y los habéis visto aquí, otros han permanecido sencillos, para poder combinar con todo, y este verano me ha dado por customizar algunos. La pintura ha sido mi gran aliada. Me encanta pintar y qué mejor que hacerlo en unos shorts que puedo acabar poniéndomelos mucho. Los primeros en tener esa suerte acabaron llenitos de estrellas y publiqué un DIY de ellos aquí (mi otro blog, que tengo un poco abandonadillo). Y he de confesar que han sido una de mis prendas HIT del verano. Si no los he sacado aún por aquí ha sido pura casualidad, porque se han venido conmigo a todos los viajes y les he dado mucho uso. Espero que el tiempo no decaiga y podéroslos enseñar en un look para estos últimos días de verano. Ya sé que muchas, después de ver tantas estrellas por todos lados habéis acabado saturadas, pero a mí me encantan! Es un estampado de lo más juvenil y divertido.

I've got a lot of denim shorts and all used to be alike,  so this summer I've been customizing them to look different and trendy. The first ones have been one of my HIT clothes this summer, my starry shorts (I made a DIY of them here - my other blog.). I have worn them a lot. They haven't appeared on the blog yet, but I'll try to show you an outfit with them before summer ends.

Otros de los jeans que han caído en esa suerte (o desgracia) del tijeretazo más posterior "personalización" a base de pintura son los que os traigo hoy. Un DIY que he ido fotografiando paso a paso y resultado del cual he quedado enamorada. Tienen un aire étnico-tribal que me chifla, he usado colores otoñales y mi adorado mostaza :P. Bueno, pues allá vamos con el proceso para crear vuestros shorts tribales.

Another shorts have been customized too. I came across them last weekend and from the first moment I knew they were going to be my new TRIBAL shorts. So I've made a DIY tutorial to show you how to do  it step by step. Let's start with it.


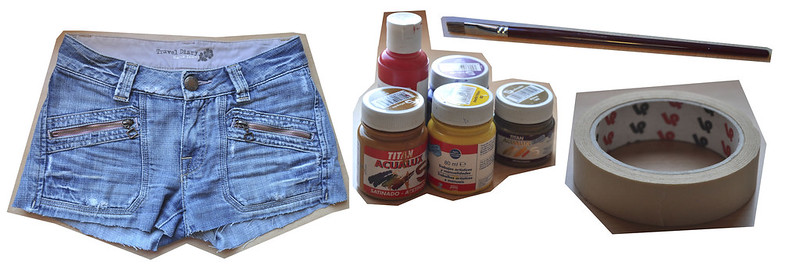
MATERIALES: shorts, cinta de carrocero, pincel o brocha y pintura acrílica.

MATERIALS: shorts, masking tape, paint-brush and acrylic paint.

diy shorts 
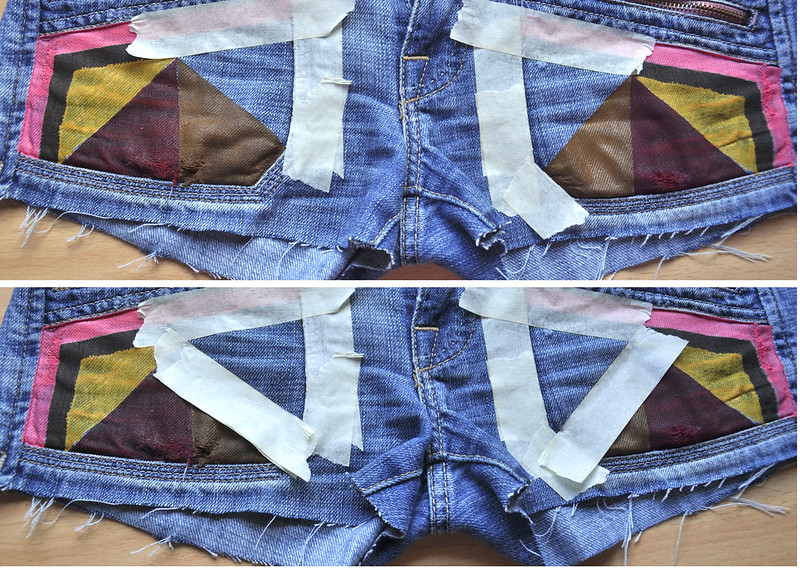
Colocamos los pantalones sobre una superfície plana y con la cinta adhesiva creamos el contorno de la primera  forma que deseemos pintar.

Put the shorts on a plane surface and use the tape to create the contour of the first shape you want to paint.
diy shorts 
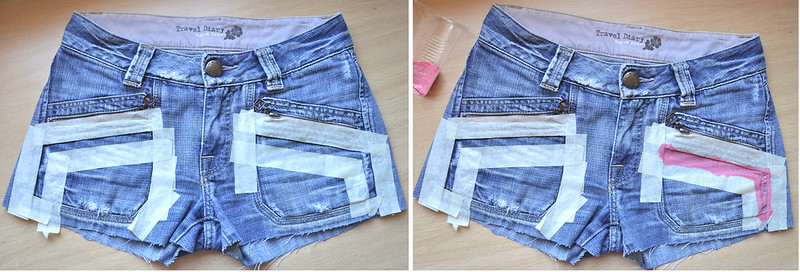
Pintamos el espacio y dejamos secar. Este tipo de pintura seca más o menos rápido. Una vez seco, retiramos la cinta y colocamos nueva creando la siguiente forma que vayamos a pintar. Como las formas están pegadas unas a otras, hay que colocar la cinta justo donde acaba la forma anterior, para que los distintos colores queden juntos.

Paint the shape and let it dry. This kind of paint dries quickly. Once it is dry, replace the tape for new one forming the shape of the new space you are going to paint. diy shorts diy shorts 
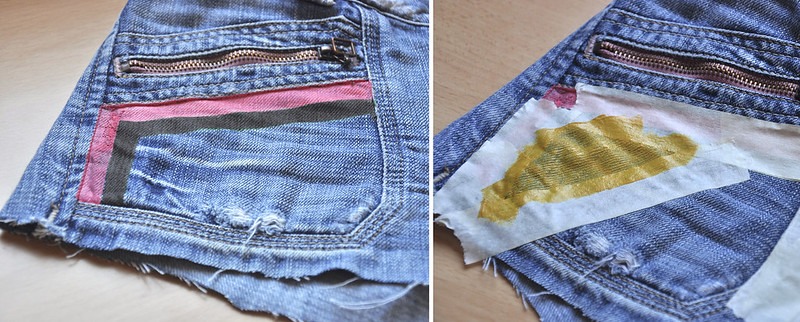
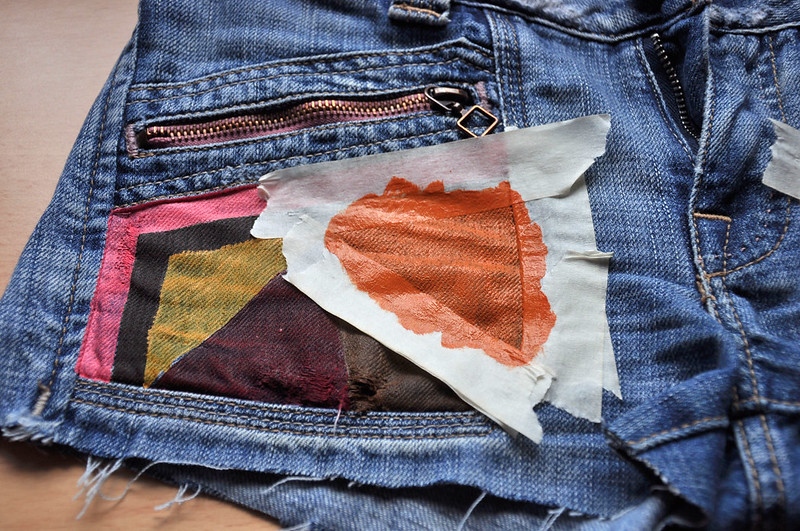
Simplemente es ir haciendo lo mismo hasta conseguir el dibujo que queráis con los distintos colores.

 You just have to do the same until you have painted the pattern you want with different colours

diy shorts diy shorts 
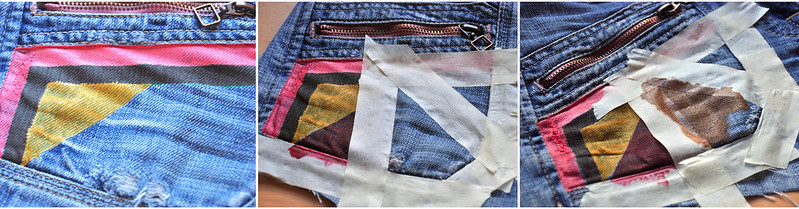
Y tachán, aquí los tenéis. La pintura acrílica, una vez seca no se va, pero para aseguraros de fijarla bien al tejido os recomiendo pasarle la plancha bien caliente por encima y ya está. Y si no os fiáis, la primera vez lavadlos por separado. :) ¿Os animáis a hacer los vuestros? ¡Me encantaría que me ensenárais los resultados! 
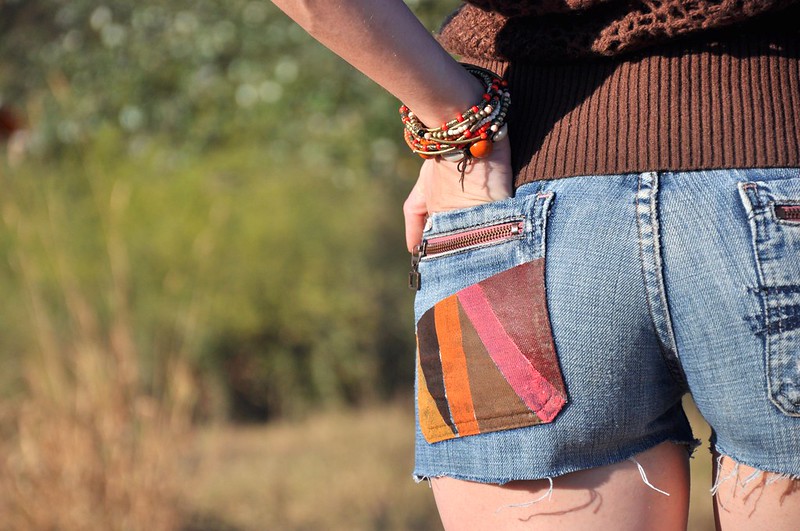
Aquí os enseño un look con ellos.

And there you have the result. This kind of paint stays on the fabric once it is dry, but to be sure  I recommend you to iron it  and the paint will be fixed on the fabric this way. If you want the first time wash them separately  :) Are you going to design your own shorts? If you do, I'd like to see them! Here you have a look with them.
diy shorts DIY tribal shorts 
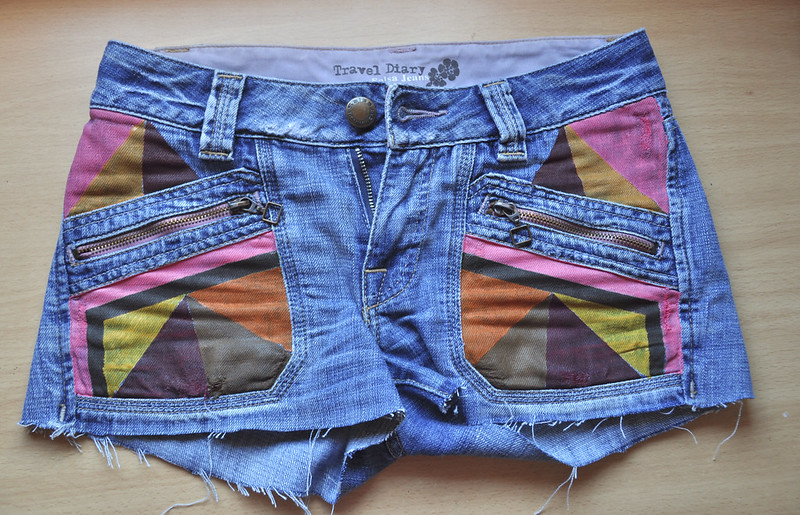
¿Qué os parecen? La verdad es que a mí me encantan. Buen fin de semana;)

What do you think? I love them. Have a nice weekend ;)

Monday 5 September 2011

The BIG dots

Mi mejor compra estas rebajas ha sido esta preciosa falda tableada de piel. Me tiene enamorada. Ya me he probado mil combinaciones con ellas, para poder usarla mucho mucho mucho este otoño e invierno. Además,     las cuñas son otro de esos caprichos de nueva temporada y espero sacarles también mucho partido ahora cuando llegue el frío con unas medias tupidas o unos leotardos.  
El top es fruto de una tarde sin nada que hacer y ganas de experimentar. Primero recorté el cuello y las mangas de una vieja camiseta blanca, luego hice unos nuditos a los tirantes, y recorté lo que sobraba por arriba, para que quedase como un "lacito". Finalmente le pinté un rombo en un morado-burdeos y unas discretas pinceladas de dorado. ¿A que ha quedado preciosa?

The leather skirt was my best purchase on sales. I've been wearing it a lot, and I'm looking forward to wear it with autumn and winter clothes. I'm in love with it. 
The top is a DIY. I cut the neck and the sleeves and then painted the diamond. Isn't it so cool? 

Camiseta/T-shirt: DIY
Falda/Skirt: Zara (sales)
Cinturón/Belt: Oysho
Cuñas/Wedges: H&M
Bolso/Bag: Mustang (old)
Anillos/Rings: H&M(old), Sfera (old)
Colgantes/Pendants: Bugs by EmerJa

Para cualquier consulta sobre los colgantes EmerJa, simplemente tenéis que escribirme un e-mail al correo que hay en la barra lateral del blog, yo os informo encantada. Ya sabéis que los realizo a mano y están hechos con mucho mucho cariño. Además, quedan preciosos:)

Por otro lado, os recuerdo que hasta el día 10 de septiembre estamos de sorteo de dos divertidos colgantes Skulls. Así que todavía estáis a tiempo de apuntaros aquí.

Saturday 23 April 2011

DIY: Fluor studded folder

Mi carpeta de la Universidad es un complemento más en mi día a día. Yo siempre llevo la de la propia universidad, la que nos dan a principio de curso, pero el otro día en una asignatura nos pidieron que llevásemos otra aparte. Entonces se me encendió la luz. Yo, que estoy obsesionada con los complementos en flúor que veo en blogs y revistas, y que necesito hacerme con alguno ya, decidí hacerme mi propia fluor studded folder.
Sólo necesitáis una carpeta de plástico en un color flúor (yo la encontré en verde), tachuelas, punzón y un poco de paciencia. Y aprovechando que ahora están también tan de moda los bolsos de plástico transparente podemos decir que llevo unas cuantas tendencias en una simple carpeta, estupendísima para mi día a día. Creo que la voy a sacar a pasear muchísimo, porque me encanta.
¿Qué os parece el resultado?
My University folder is just another accessory in my daily life. The other day, in one subject we were asked to bring another folder different from the one we use normally. So it was my oppotunity to create my own fluor studded folder (I'm obsessed with the fluor accessories trend). All I needed was a fluor folder(I chose it green), studs, a hole punch and a little patience.
And here you have the result. What do you think about it?
Image Hosted by ImageShack.us