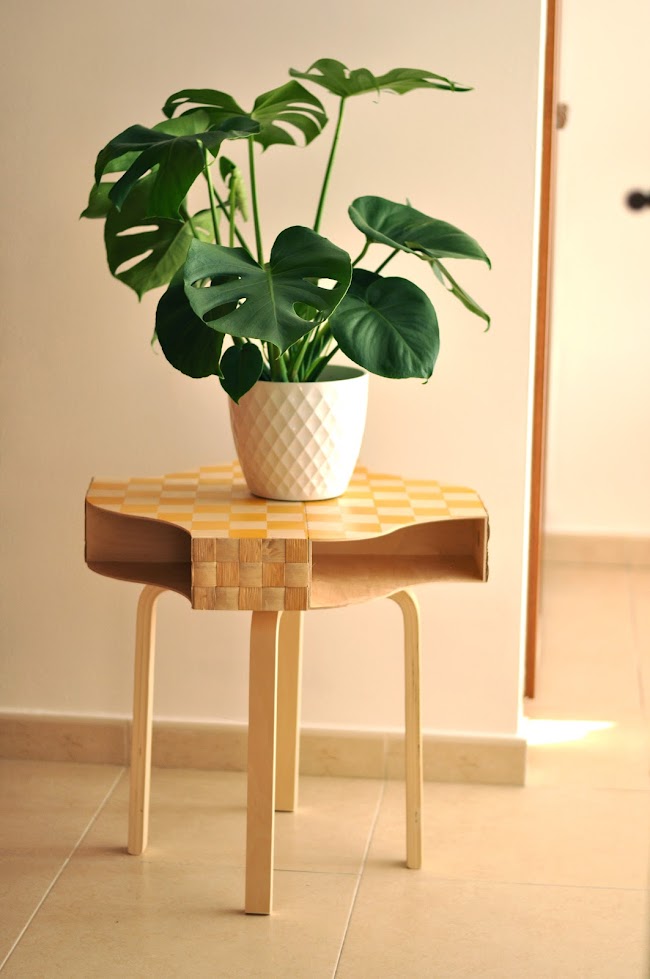
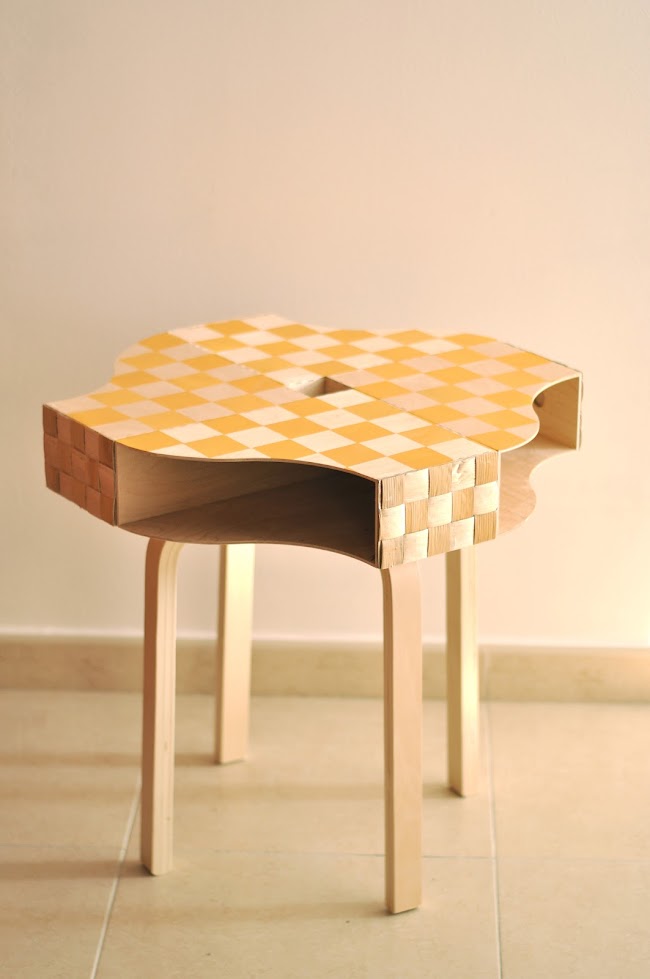
Lately, with the home moving I have been totally into decorating it all. Fashion DIYs have been left aside for a while (no worries, coming new ones in a few days!)and deco DIYs have been almost a priority. I say a priority because we wanted to make our new flat completely ours, creating special details and corners and customizing some of the furniture. For it, we looked for ideas on the net; surfing the Internet we found a lot of inspiration. Today's project is one of my favourite pieces at home and it was inspired by this very interesting Ikea Hack from which I did a new version. I hope you like it!
Últimamente, con la mudanza he estado completamente centrada en su decoración. Los DIY de moda los he dejado a un lado (en breve vuelvo con nuevos)y los DIY de decoración han sido casi una prioridad. Digo una prioridad porque queríamos hacer nuestro nuevo hogar muy nuestro, creando detalles y rincones especiales y customizando algunos de los muebles. Para ello he buscado muchas ideas en la red, donde he encontrado gran cantidad de inspiración. El proyecto de hoy es una de mis piezas favoritas en casa y de la que estoy contentísima. He hecho mi propia versión de este hack de Ikea. ¡Espero que os guste!
MATERIALS/MATERIALES
- 4x Ikea KNUFF Magazine files / 4x Archivadores KNUFF Ikea- Ikea FROSTA stool / Taburete FROSTA Ikea
- Ikea NASUM basket / Cesto NASUM Ikea
- Contact adhesive / Cola de contacto
- Masking tape / Cinta de carrocero
- Acrylic Paint / Pintura acrílica
- Brush / Pincel o brocha
- Colourless varnish for wood / Barniz incoloro para madera
- Scissors / Tijeras
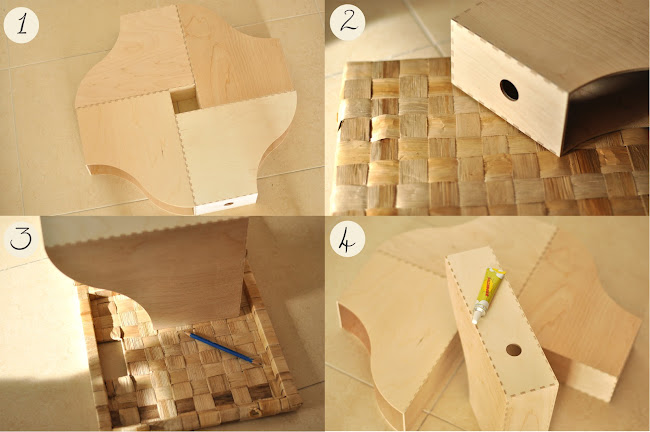
Start by placing on the floor the magazine files in the shape I show you in the picture, in order to have in mind the way they have to be put. Next part (the covering with basket pieces) was half documented, but I hope you understand how to do it just with my instructions. Disassemble the NASUM basket and on the reserve of one side, place the short side of the file(the one that's going to be on the exterior face of the table)and trace with a pencil its shape. Do this step 4 times. Using contact adhesive, glue each of the four basket pieces to the short side of each magazine file. Leave it dry.
Empieza colocando en el suelo los archivadores de la forma como se ve en la foto, para tener en mente como habrán de ir situados. El siguiente paso (forrar la madera con trozos del cesto) no está del todo documentado con fotos, pero espero que simplemente con mis instrucciones podáis entenderlo. Desmontar con el cesto y en el reverso de una de las caras colocar la parte corta de uno de los archivadores (que quedará en el exterior de la figura formada por los archivadores), trazar con un lápiz su forma y recortar. Repetir 4 veces. Con cola de contacto pegar cada pieza de cesto que hemos recortado en cada una de las caras cortas (en la más pequeña de las que tienes agujerito) del archivador. Dejar secar.
Now it's time to use contact adhesive again and stick each of the files together, as explained in the first picture. Leave it dry.
Volvemos a usar cola de contacto para pegar los 4 archivadores entre sí, tal y como vimos en la primera imagen.
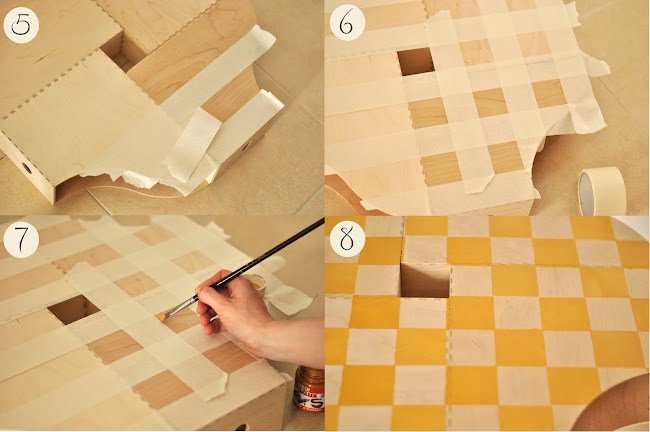
Once it is dry, use masking take to create a chess board on the top of what's going to be the table. Use a band of masking tape to help you in leaving the spaces between each new masking tape strip and this way creating perfect squares. Do it vertically and horizontally. I've used mustard acrylic paint to colour it. Colour, leave it dry and take off the masking tape. Create the same grid but hiding the already painted squares, this way you'll get the perfect chess board in wood and mustard.
Una vez está seco, vamos a crear un tablero de ajedrez en lo que será la parte superior de la mesa. Para ello se usa cinta de carrocero, formando una cuadrícula de tirar verticales y horizontales. Para saber la separación entre cada tira usa otra tira, que hará que los cuadros sean cuadrados perfectos. Se pintan los espacios creados (yo he usado pintura acrílica mostaza) y una vez seco se quita la cinta y se hace una cuadrícula nueva pero a la inversa; tapando los cuadros que ya han quedado pintados. De este modo, resultará en un tablero de ajedrez en madera y mostaza.
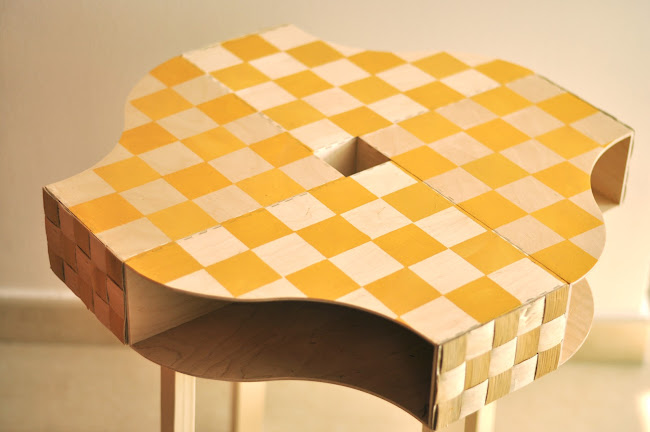
Next steps are easy. Varnish the created structure and once it is dry, glue it to the stool, that will make the legs of the table. And Ta-daah! Here you have it :) Not very difficult, is it?
Los siguientes y últimos pasos son los más fáciles. Vanizar la estructura formada y una vez seca pegarla al taburete que hará las veces de patas. Y ¡tachán! Ya lo tenéis. No es difícil, ¿no?
37 comments
pero que chulada!!!
Ohhh qué chulada!! te ha quedado genial.
Besos.
Gemeladas
es genial, m ncanta. q artista eres!
mil besos
NEW OUTFIT IN THE BLOG: READY FOR THE MATCH
http://showroomdegarde.blogspot.com.es/2014/06/ready-to-match.html
Fabulous !!
I really love it !
Your blog design is amazing !
Inès from Paris
Http://www.frenchfashiontouch.com
Madre mía vaya manitas que Dios te dio hija mía... haces maravillas con ellas.
Un besito, que ganas de verte
Mila
http://www.styleinlimablog.com/
Te ha quedado genial pero vaya currada!!
muacarmen.blogspot.com
Vale, tengo una duda tonta muy grande jajaja ¿como se llama la planta?
En cuanto al DIY, ¡que maravilla! Queda precioso y super original, la verdad que jamás se me hubiera ocurrido hacer eso con archivadores. ¡Seguro que os queda un nuevo hogar precioso! Queremos más fotos :)
WOW, this is so amazingly inventive, LOVE it! I hope you will stop by to share this at The Makers link party going on at my blog, UpcycledTreasures.com
Hope to see you there!
~Katie
A
L
U
C
I
N
O
!!!
Una mesa de diseño muy especial. Sin duda, un objeto como este puede convertirse en el protagonista de tu hogar o del espacio que esté ocupando. Es difícil combinarlo con el resto de muebles y objetos decorativos de tu hogar pero el resultado es fantástico.
Casino Finder (Google Play) Reviews & Demos - Go
Check Casino 바카라 사이트 Finder (Google Play). A look at some gri-go.com of the best gambling sites in the 1xbet korean world. They offer a full casino-roll.com game library,
Una mesa preciosa. Existen muchos artículos exclusivos como estos que aportarán a tu hogar un estilo inconfundible. Si quieres amueblar tu casa con estilo y con objetos de diseño, echa un vistazo a los diferentes alternativas que te ofrece el mercado.
First of all, I'd like to say it's a wonderful blog 카지노사이트! I had a drink. If you don't mind 토토, I'd like to ask you something. Before writing, I was wondering how to balance my thoughts 우리카지노탑. I had a hard time organizing my thoughts 토토사이트. I enjoy writing, but the first 10 to 15 minutes seem to be wasted thinking about how to start 안전놀이터. Do you have any recommendations or tips 스포츠토토? Kudos!
I wanted to thank you for this excellent read!!
Awesome post.Thanks for sharing. This is so nice.
Thanks and Best of luck to your next Blog in future.
Thankyou for all your efforts that you have put in this.
Thanks you for this. Read this blog. It is always so lovely.
THANK YOU FOR SHARING THIS KIND OF INFORMATION!
I located the information very useful. You're a great author in this generation, thanks
Hi there it’s me, this website is actually nice and the users are really sharing nice thoughts.
An interesting discussion is definitely worth comment. Write more, All the best!!
Valuable info. Thanks I discovered this awesome website here.
Lot of informative blog are provided here, Happy to read this good post. Thanks a lot
Type of fantastic informative web site, Awesomeness! Thanks
It’s really a great and useful piece of information. Keep doing it!
I am glad that you shared this useful information with us. Thanks
Please keep us up to data like this. Thanks for sharing and Keep on writing
Everyone loves it Great website, continue the good work! Thanks
I'll bookmark it and come back to read more of your useful info. Thanks for the post.
Can’t wait to see your post soon. Good Luck for the upcoming update.
This is very interesting article and effective dude. Thankyou for sharing
Your style is so unique. I’ve enjoyed read stuff here. Waiting for your next post.
Hello, I'm happy to see some great articles on this site. thankyou so much
I enjoy reading this post. Also, thanks for allowing me to comment!
I know this is one of the most meaningful information for me. Thanks
Je souhaite développer une culture de champignons adaptogènes en France. Ces champignons, reconnus pour leurs bienfaits sur le stress, l’énergie et l’immunité, sont de plus en plus recherchés pour leurs propriétés naturelles. Mon objectif est de proposer une production locale et responsable, garantissant une qualité optimale tout en favorisant le développement d’une filière durable en France.
https://naturemush.fr/produit/chaga/
Post a Comment