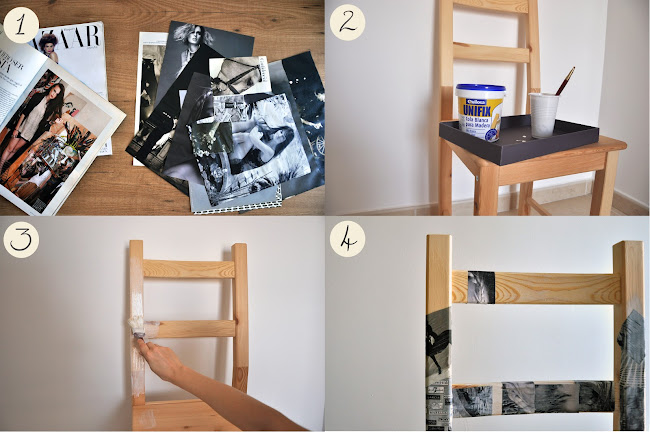
As I told you, some deco DIYs were coming. We are making our flat totally ours with details like this, where we put our personality and imagination. Little corners, small furniture, plants here and there... Today's tutorial consists in the transformation of a basic Ikea chair into an original one. It's easy, cheap and the techniques permit a lot of different result. Let's get to work!
Como os dije, varios DIYs deco venían en camino. Estamos haciendo nuestro piso totalmente nuestro con pequeños detalles donde ponemos nuestros cariño y personalidad. Rinconcitos, pequeño mobiliario customizado, plantas aquí y allá... El tutorial de hoy consiste en la transformación de una silla básica de Ikea a una más original. Es fácil, barato y las técnicas que se usan se pueden aplicar de distintos modo creando diferentes resultados al gusto de cada uno. ¡Pongámonos a ello!

MATERIALS/MATERIALES
- Chair / Silla- Magazines / Revistas
- Scissors / Tijeras
- Brushes (thin and thick) / Brocha y pincel
- White glue / Cola blanca
- Acrylic Paint / Pintura acrílica
- Masking tape / Cinta de carrocero
- Varnish / Barniz

Make a selection of images from magazines to cover the chair with. I used black and white images mostly and some with blue tones. Then, mix some white glue with water in a plastic glass to make it more liquid. Cover some surface of chair with the mix and start placing the pieces of magazine, putting some more glue over every time you add a paper. Don't worry about the white of the glue, it will become transparent when dry. Try not to put big pieces of magazine, because it wrinkles easily. Cover all the parts of the chair you want with magazine images and let it dry for some hours.
Haz una selección de imagénes de revista con las que forraremos gran parte de la silla. Yo he usado imágenes en blanc y negro y algunas en tonos azules. Una vez las tengas, mezcla en una vaso de plástico cola blanca con un poco de agua para hacerla más líquida. Cubre un trozo de superficie de la silla con la mezcla de cola y empieza a ir pegando los trozos de revista, volviendo a cubrirlos con cola una vez enganchados. No os preocupéis si se ve en blanco de la cola, una vez seco queda transparente. Os recomiendo no poner grandes trozos de revista, ya que el papel tiende a arrugarse y es más fácil que quede mejor si son más pequeños. Una vez tengamos cubierta toda la superficie deseada, dejamos secar varias horas.

Once it is dry, add a thicker layer of glue (less water) all over the magazine surface, to protect the surface and get a shiny look. Let it dry. Next step consists of painting the parts that haven't been covered with the images. I decided to use blue and white acrylic paint. To delimitate the zone that you want to paint, use masking tape, it will help to have straight borders and a better result. Use the colours as you like. When you're satisfied with the result, varnish the coloured parts. It's not necessary to varnish the other parts of the chair as they have already the protection to the white glue. And this is it. Tachán!
Cuando esté seco, añadir una capa más espesa de cola, sobre todo el trozo que hayamos cubierto de revista; servirá para proteger la superficie y darle además un aspecto brillante. El siguiente paso es pintar aquellos trozos en que la madera haya quedado a la vista, aunque podemos dejar también algunos así. Yo he escogido pintura acrílica en blanco y azul. Con cinta de carrocero nos será más fácil delimitar las zonas a pintar y crear unos bordes más definidos y limpios, pero si tenéis buen pulso lo podéis hacer sin necesidad de la cinta. Ir creando formas a vuestro gusto. Una vez seco, barnizamos el área pintada para que la pintura quede más protegida. Y ¡tachán! ya tenemos nuestra silla.

9 comments
Love that chair. What a cool idea
www.highheelsandtutus.com
Very original! Will remember this one ;)
¡Qué chula! Te ha quedado genial.
XOXO
synonym4fashion.blogspot.com
Super chula!
Besos.
Gemeladas
Wow, this idea is really cool! Thanks a lot for sharing <3
xx from Germany/Bavaria, Rena
www.dressedwithsoul.com
Que chula te ha quedado!
¿sabes a que me ha recordado muchísimo?
A que cuando era pequeña, forraba las carpetas del cole con fotos recortadas de una forma super parecida.
Debía tener 13 o 14 años.
Pegaba las fotos y luego ponía plastico adhesivo encima.
Me ha hecho ilusión verlo.
QUÉ PASADAAAAAA!!!! Eres una artista!!!
Eli S
¡Qué ideal! Este tipo de muebles son fantásticos para decorar el hogar. Sin duda, existen un montón de artículos geniales para poder introducir en tu hogar. Lo más importante es buscar aquellos que mejor se ajusten a tus necesidades.
This DIY project sounds like so much fun!
Post a Comment