This DIY trench is an easy transformation of a basic garment that comes back every spring to be a must have. I had this one in my wardrobe and was asking for a change. Eye prints have been seen everywhere, on fashion shows and streetstyle looks, so I wanted to make my own version of it and cheer up my trench. I already showed you a preview on my Instagram and the comments were really good, so I hope you like the result and dare to make your own one. Shall we start?
La gabardina DIY de hoy es una transformación muy fácil de un básico que primavera tras primavera vuelve a ser un must. Yo tenía este olvidado en el armario y pedía a gritos un cambio. Hemos visto estampados con ojos por todas partes, en desfiles y en la calle, así que quería animarme a hacer mi propia versión y alegrar mi prenda con este divertido print. Ya os enseñé un avance de él en mi Instagram y vi que os estaba gustando mucho. Ya veréis que no tiene nada de complicación y espero que el resultado os guste. ¿Empezamos?

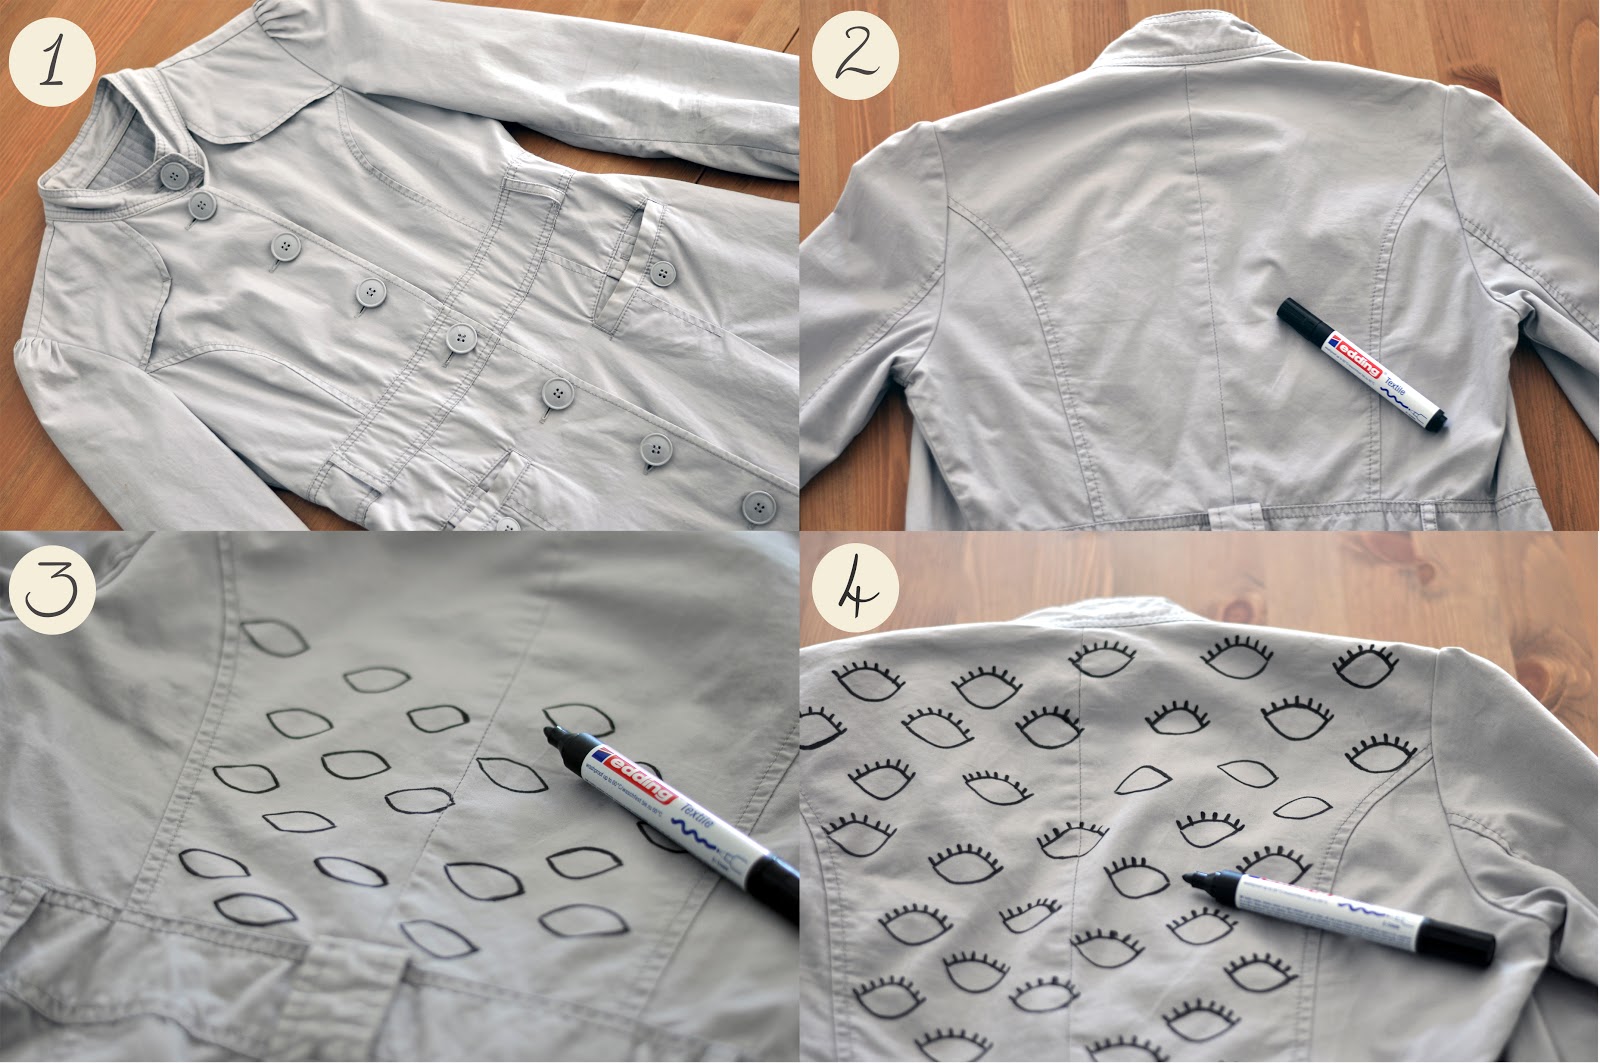
Materials: Trench, textile marker in black, thin brush, blue acrylic paint.
Materiales: Gabardina, rotulador textil, pincel fino, pintura acrílica azul.
The process of this DIY is simple and quick. First, draw the eyes with the black textile marker all over the part you want to print. Start by drawing just the eye contour (almond shape) so you see the distribution of every shape on the space. Then, draw the eyelashes and the iris. With a thin brush and blue acrylic paint, colour the iris. Leave it dry. Once dry, draw the pupil in the middle of the iris using a black dot with the marker. Iron without stem to fix. And that's it. Ready to wear. Easy, isn't it?
El proceso de este DIY es simple y rápido. Primero, dibuja con el rotulador textil el contorno del ojo (en forma de almendra) por toda la zona donde se desee, para distribuirlos bien por todo el espacio que se tiene. Seguidamente dibuja las pestañas y la circunferencia que forma el iris. Después, con pintura acrílica azul y un pincel fino rellena el iris. Deja secar. Una vez está seco al tacto, con el rotulador pinta un punto negro en el centro a modo de pupila. Plancha sin vapor para fijar la tinta y la pintura a la tela. Y ya está lsito para usar. Fácil, ¿no?

Este es mi primer DIY con rotulador textil y la verdad es que estoy contenta con el resultado. tenía miedo que la tinta se corriese un poco por el tejido y no quedasen las líneas todo lo definidas que quería, pero al ser el tejido de la gabardina fuerte y con cuerpo, ha quedado muy bien. En cambio, aunque este tipo de rotuladores se usan mucho para pintar camisetas de algodón, el resultado en ellas no me convence, ya que es un tejido suave y la tinta se esparce un poco al hacer las líneas. Seeguro que voy a volver a usar este tipo de rotuladores en otros proyectos. Estad atentos. ¡Que tengáis un muy buen día!
This is my first DIY using a textile marker and I'm pretty satisfied with the result. Doing the eyes contour with it was easier than doing with paint and brush. I was a bit worried to find the ink running through the fabric, but, as the trench cloth is thick, it works really well. It is normally used in cotton T-shirts, but I don't like the result on them, because the fabric is soft and the ink runs. For sure, I'll use it in more DIYs. So stay tuned. Have a nice day!
8 comments
Genial la chaqueta!!
new look on my blog,
http://sweetmona.com/blog/green-camuflaje-glitter/
que chula!!!
Además de guapa y estiloza, eres creativa!
Muy lindo ha quedado y muy lindo se te ve!
Besitos!
pazhalabirodriguez.com ♡
Te ha quedado genial!!
www.muacarmen.com
ay ay ay ayyyy pero que idea tan chulaaaa :D
me ha encantado, es preciosa :D
tomo nota
http://diannetho.es
Wow babe.. That's amazing.. Can't believe you did this! Sadly, I think if I drew my eyes on they wouldn't be as good as yours! x
www.meetmeinparee.com
Muy fan de tus DIY <3 <3
Muuuuuas!
www.silviaboschblog.com
Post a Comment