Showing posts with label DIY. Show all posts

Thursday 10 October 2013

DIY: Cloudy Mini Bag

Continuing with the topic of my last DIY, today's proposal is the transformation of an eyewear-case into a XS bag. Although what we can wear in a mini bag is very limited, I think they are a very chic accessory and love the,, specially for those days when we don't want to be carrying a big bag all the time. The eyewear case was a bargain I bought in Primark last summer and the chain has been used for several projects, because when I buy chain I buy meters, so it is cheaper. So, as you can see, today's DIY is very low-cost. I wanted a fun accessory with personality; the clouds and nice sentence on it give a naive touch to the garment. Do you like it?

Siguiendo la estela del DIY anterior, hoy os traigo una propuesta para convertir una funda de gafas rígida en un mini bolso. Los bolsos XS me encantan y es que, aunque lo que cabe dentro es muy limitado, me parecen un complemento chic para muchos looks, especialmente para esos días en que no tenemos ganas de ir cargando con un bolso grande todo el rato. La funda la compré en Primark el verano pasado a un precio de risa, creo que rondaba los dos euros, y la cadena me sobró de hacer collares, ya que cuando compro lo hago a metros y así sale más a cuenta. Así que, como podéis ver, el DIY de hoy es también muy barato. Me apetecía que fuese un accesorio con personalidad y que tuviese un puntillo divertido. Unas nubes para un toque naïf y una frase bonita para acabar de endulzarlo. ¿Os gusta?

Monday 7 October 2013

Short suit

I have to admit that I've never been a fan of blazers, I like to see them on others, but I don't like how they fit me. I have only one in my wardrobe, the one on the pictures, and I can count the times I've worn it with one hand. This weekend I wanted to give it a chance and tried how it paired with a dark blue high-waisted shorts and a striped croptop. I must say that I love it because the shorts and the top make the look less serious, but still the right "dressep-up" I was looking for. And the thing is that I feel totally comfortable in this style. Often, some risk on wearing garments we are not very used to results in a great option. What do you thing? Have a nice week!

He de admitir que nunca he sido de americanas. Me gusta verlas en otras, pero no me gusta cómo me veo yo con ellas. Sólo tengo una en mi armario, la de las fotos, y puedo contar con una mano las veces que me la he puesto. Este fin de semana decidí darle una nueva oportunidad combinándola con unos shorts de tiro alto en azul oscuro, un croptop de rayas y mis sandalias favoritas. Debo decir que me encanta el resultado ya que las otras prendas hacen que el conjunto sea menos serio, pero aún así con el toque "arregladito" que yo buscaba. Y lo mejor es que me siento muy cómoda con este estilo. A menudo, cuando arriesgamos con esas prendas a las que no estamos habituadas, nos damos cuenta que acaban resultando en una buena opción siempre que las adaptemos a nuestro estilo. ¿Qué opináis? ¡Que tengáis una maravillosa semana!

short suit emerja short suit emerja  streetstyle short suit emerja  streetstyle short suit emerja  streetstyle short suit emerja  streetstyle short suit emerja  streetstyle short suit emerja

Blazer: Zara(old) · Top: Zara(old) · Shorts: Oasap · Sandals: Chie Mihara via Spartoo · Clutch: DIY

Thursday 26 September 2013

Embroidered

The dress has been hanging in my wardrobe for weeks, trying to find the moment to wear it and I realised that I really needn't a special moment to wear it, just the right accesories to feel in the mood of using it. It's very sweet, very babydoll and I love its embroidered flowers, but I wanted to "cut" this tenderness (yes, always looking for the "wear-it-casual"!) with the denim DIY vest, the tote bag and the studded boots.

Este vestido lleva colgado en el armario semanas intentando buscar la ocasión ideal para estrenarlo, hasta que me he dado cuenta de que no hay necesidad de buscar el momento de llevarlo, sino los accesorios que le van y hagan que me apetezca ponérmelo. Es muy dulce, muy aniñado y me encantan las flores bordadas del pecho, pero otra vez he ido en buscar de "cortar" esa delicadeza (sí, yo siempre en busca de el "llévalo-casual") con el chaleco DIY denim, el bolso grande y los botines de tachuelas. ¿Lo he conseguido? A mí, la verdad es que me convence mucho el resultado.

Dress: Chicwish · Denim vest: DIY · Boots: Zara (old) · Bag: David Jones via Spartoo

Monday 23 September 2013

DIY: Clutch inspired by Charlotte Olympia's Wolfie

Charlotte Olympia's designs are a great source of inspiration; original and colourful accessories that are desired by lots of fashion lovers in the world. I was looking forward to make my own DIY version of one of her clutches so when I was given a cosmetic bag when buying a shower gel I knew it was a good excuse to get on with it. Wolfie clutch has been the object of my inspiration; I like the mix of fabrics and fun touch of the wolf on it.

Los diseños de Charlotte Olympia son una gran fuente de inspiración, originalidad, colorido y humor caracterizan sus piezas que son deseadas por muchas fashionistas. Tenía ya ganas de crear mi propia versión DIY de uno de sus famosos clutches así que cuando me regalaron un neceser al comprar gel de ducha, vi que era el momento ideal para ponerme manos a la obra. Wolfie ha sido el objeto de mi inspiración: me encanta su mezcla de tejidos y el toque divertido que le da el lobo.

Materials/Materiales

- Clutch or cosmetic bag / Clutch o neceser
- Card with template / Cartón con plantilla
- Scissors / Tijeras
- Piece of leather / Retal de piel negra
- Red and White felt / Fieltro rojo y blanco
- White glue / Cola blanca
- Brush / Brocha
- Thread and needle / Aguja e hilo
- Pins / Alfileres
Create the template drawing a picture of the wolf or printing it from an image on a card. Cut the contour to have your wolf and fix it to the back of the leather with pins. Use a pen to draw the contour on the leather and cut it. Take into account that depending on what side you draw the wolf on the leather it will look to the rigth or to the left when sticking on the clutch.

Para crear la plantilla, haz un dibujo del lobo o imprímelo en un cartón fino. Recorta en contorno y fíjalo al reverso de la piel con alfileres. Usa un bolígrafo para dibujar en contorno sobre la piel y recórtalo. Ten el cuenta que, dependiendo de como coloquemos la plantilla sobre el piel, el lobo mirará para un lado o para el otro cuando lo coloquemos en el clutch.

Using a brush, cover all the reverse of the wolf with white glue and stick it in the middle of your clutch. Let it dry for about 30 minutes. Cut a piece of red felt to make the tongue and white felt for the teeth and sew them to the clutch. And finally, sew a small bead for the eye. The glue won't be completely dry, so let it dry for a few hours to completely guarantee that it is fixed to the fabric. And that's it; enjoy your amazing DIY. I love it. What do you think?

Con una brocha, cubrir todo el reverso del lobo con cola blanca y pegarlo en el medio del clutch. Dejar secar durante unos 30 minutos. Cortar una pieza de fieltro rojo para la lengua y en fieltro blanco cortar los dientes. Coser las piezas a la tela. Finalizar cosiendo una cuenta redonda que haga de ojo. La cola no estará completamente seca, así que dejar secar durante unas horas para asegurar que esté fija a la tela. Y ya está, a disfrutar de vuestro DIY. A mi me encanta, ¿y a vosotras?


Wednesday 18 September 2013

DIY: Statement necklace

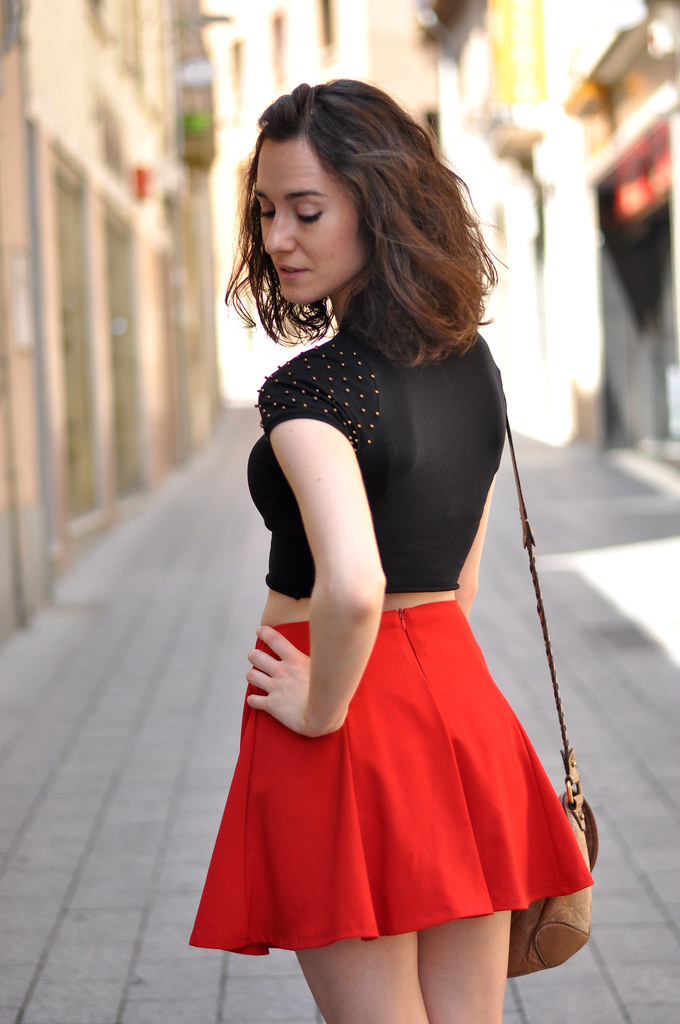
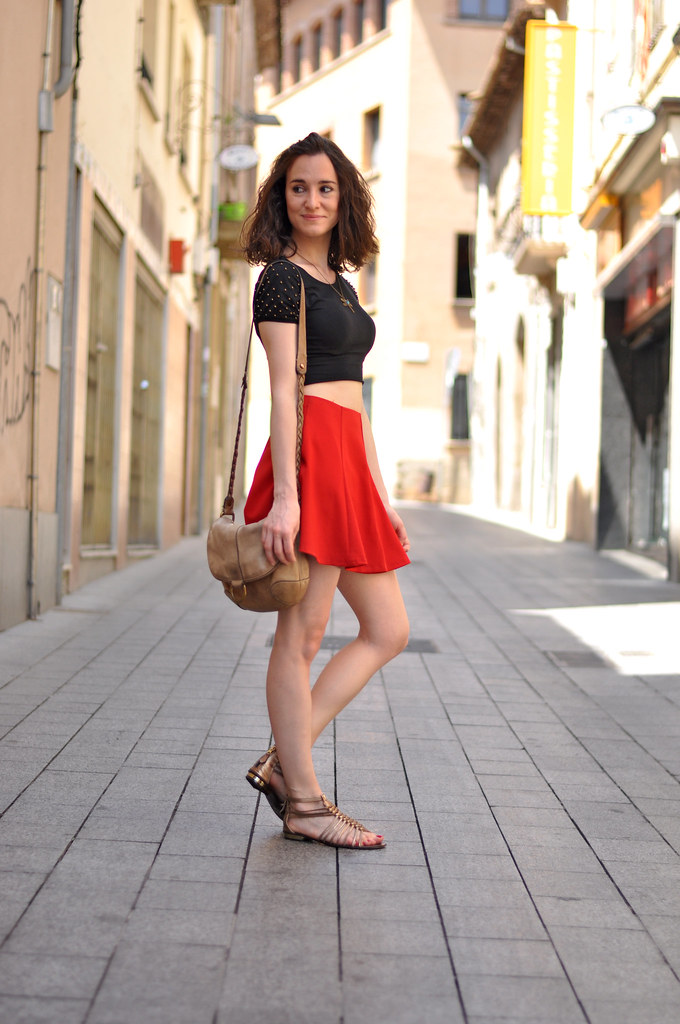
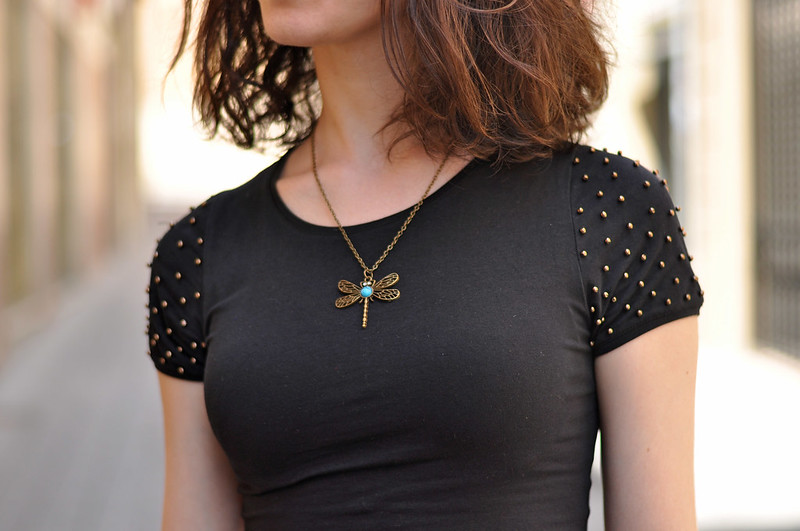
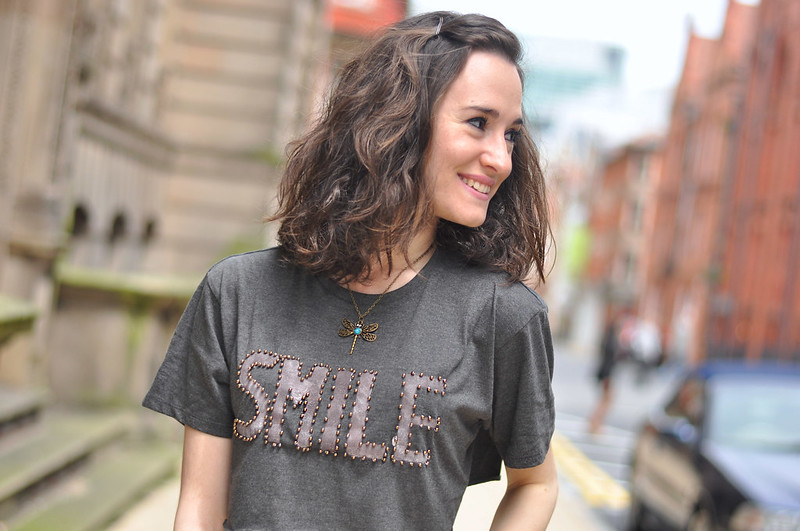
How amazingly can a statement necklace transform a look! I have some in my jewellery box, but I'm never tired of them, that's why I decided to make my collection grow a little bit more with this colourful and original DIY. The main material is a modelling paste that dries with air, so you don't need a special oven to do it and all the materials are really easy to find. I love working with this clay because it gives you a lot of possibilities in jewellery.

¡Cómo puede cambiar un look añadiéndole un bonito collar XL! Tengo varios en mi joyero, pero la verdad es que nunca me canso de ellos y por eso mismo me he animado a ampliar mi colección con este original y colorido DIY. El material principal es una pasta para modelar que seca al aire, por lo que no necesitamos un horno especial para cocerlo y el resto de materiales también son muy fáciles de encontrar. Me encanta trabajar con esta pasta, ya que ofrece gran cantidad de posibilidades, sobre todo en joyería.
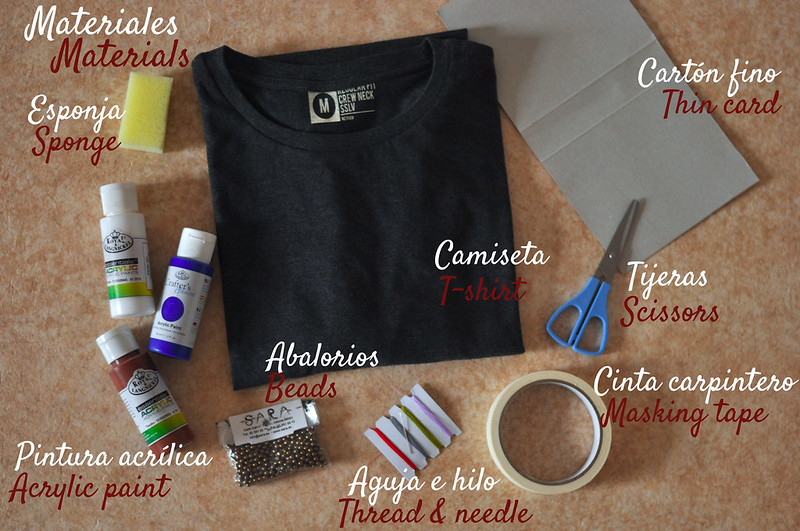
Materials:

- Air dry modelling paste / pasta de modelas de secado al aire
- Roller pin / rodillo
- Pallette knife or spatula /espátula
- Biscuit mould / molde para galletas
- Sharp stick / palillo afilado
- Acrylic paint / pintura acrílica
- Varnish / barniz
- Brush / pincel
- Pliers / alicates
- Chain, round rings and lobster clasp / cadena, anillas y mosquetón
Cut a piece of modelling paste and make a ball with it using your hands. To manipulate it better you can moisten your hand with some water. Put the ball over the surface you're going to work and press it with your fingers a bit. Use the rolling pin to flatten the dough until it is about 1 cm. Carefully, with your hands, unstick it from the surface, face it down and press with the roller pin until it is about 0,5 cm. Try not to manipulate the pieces with your hands a lot, because finger prints don't make them beautiful.

Corta un trozo de pasta y hazla una bola con las manos. Para manipularla mejor puede humedecerte más manos con un poco de agua. Ponla sobre la superficie donde vayas a trabajar y cháfala con los dedos. Con un rodillo aplánala hasta tener un grosor de aprox. 1 cm, despégala de la mesa con cuidado y aplánala ahora por el otro lado, hasta que quede un grosor final de 0,5 cm. Para que las piezas queden bonitas, hay que tocarlas lo menos posible con las manos y si se hace que sea con mucho cuidado para no dejar huellas.
Use the biscuit mould to create the necklace pieces. Remove the excess of paste and unstick the pieces using a spatula o palette knife. With this tool or very carefully with wet fingers, you can smoothen some edges that may not be perfect. With a sharp stick (I used the ones for the brochettes) make a hole at the top of each piece. Leave the pieces dry for one day.

Usa el molde para galletas para crear las piezas. Quita la pasta restante y despéga las piezas con ayuda de una paleta. Con la misma paleta o cuidadosamente con los dedos mojados, se pueden pulir algunos bordes que hayan quedado menos perfectos. Con un palo afilado (yo he usado los de hacer brochetas) haz agujeros en una de las esquinas de cada pieza. Deja secar durante un día.
Mix the acrylic paint to paint the base of the pieces. Once they are all painted and dry, with a pencil draw a rhombus at the bottom of each piece and paint with another color.

Mezclar las pintura acrílica para pintar la base de las piezas. Una vez estén todas pintadas y secas, con un lápiz dibujar un rombo en la parte inferior de las piezas y pintar con otro color.
First, with a thin brush, paint the border and then colour the rest of the shape. When they are dry, varnish them. Now it is time to put all the pieces together in a chain to create the necklace.

Con un pincel fino, primero, repasar el contorno y luego rellenar la figura. Cuando estén las piezas secas, barnizárlas. Ahora llega el momento de montar las piezas en la cadena para crear nuestro súper collar.
Cut the chain (length of your choice) with the pliers and add a ring and a lobster clasp to one of the ends. Open the round rings and put them in each of the pieces. Fold the chain in half to know where's the middle, and put a stick in the link where the center is, to have it as a reference to start adding the pieces to the chain. Leave the same number of links between each piece you add. Use the pliers to close each ring. That's it! Now you can enjoy your piece of art.

Corta la cadena a la medida deseada con las tenazas y añade una anilla y un mosquetón a uno de los finales. Abre las anillas con los alicates y colocada cada una en una de las piezas. Dobla la cadena en dos para saber donde está el centro y coloca un palillo en medio para tener la referencia a la hora de ponerte a enganchar cada pieza a la cadena. Ten en cuenta que has de dejar el mismo número de eslabones entre pieza y pieza. Cierra las anillas con las tenazas. ¡Y ya está! A lucir bien orgullosa tu obra de arte.

You can view more DIY tutorials here
Puedes ver más tutoriales DIY aquí

Tuesday 16 July 2013

Cropped in black

As I told you, crop tops are a must this summer and together with high-waisted pants and skirts they make a perfect combo. The one I wear in today's look was a DIY I made last summer and I know I'll wear a lot these scorching days because it is fresh, girlish and very comfy. I just cut a slim fit T-shirt and sewed some beads on the sleeves; easy and with a wonderful result. This time I wore it with one of my favourite summer skirts, but I've already worn it with other pieces. Maybe you'll see it more times on the blog :) By the way, I'm back in my city again, Barcelona. UK's adventure is over, but I'm positive and think that this new stage in my life is going to be very good as well. Enjoy your day!

Como os comenté en posts anteriores, los tops cortitos son una pieza esencial este verano; toca enseñar abdomen. Hacen un mix perfecto con faldas y pantalones de tiro alto, dejando simplemente un trozo de piel al descubierto. El que llevo en el look de hoy es un DIY que hice el veran pasado y que voy a ponerme mucho estos días de calor insoportable que tenemos en Barcelona. Es cómodo, fresco y femenino, además de ser muy fácil de hacer. Simplemente se necesita una camiseta ajustada que cortamos ala medida que queramos, y cosemos los abalorios por las mangas. En esta ocasión lo llevé con una de mis faldas de verano preferidas, con un vuelo precioso, pero ya me lo he puesto con otras prendas. Posiblemente lo veáis más veces por el blog. Por cierto, ya estoy de vuelta en Barcelona, se acabó la aventura, pero estoy positiva y creo que va a empezar una nueva buena etapa en mi vida .¡Disfrutad del día!
crop top DIY crop top DIY crop top DIY crop top DIY crop top DIY crop top DIY crop top DIY
Crop top: DIY
Skirt/Falda: Romwe
Bag/Bolso: Massimo Dutti (old)
Sandals/Sandalias: Bronx via Spartoo

Wednesday 3 July 2013

DIY: Crop top with message

On Monday I showed you my DIY crop top on a look and today here you have the tutorial, step by step, to know how to do your own message crop top. I'm already thinking of new crop top designs for this summer; I'll show you if I finally decide on making them. The tutorial I am explaining to you today isn't difficult but it takes time, so you have to be very patient when doing it. Are you ready? Just follow the steps!

El lunes os enseñé en un look el crop top DIY que me he hecho y hoy os traigo el tutorial para que podáis haceros el vuestro. Ya estoy pensando en nuevos diseños de crop top para este verano, creo que va a ser una de esas prendas que voy a llevar mucho por lo cómodas que son y las posibilidades que dan. Os los enseñaré si el final me decido a hacerlos. El tutorial que os explico hoy no es nada difícil, pero requiere su tiempo así que se necesita paciencia. ¿Estáis listas? Simplemente hay que seguir los pasos.

DIY crop top
Fold the T-shirt vertically in a half and cut it straight as you like, depending how cropped you want it. Take into account that the border of the T-shirt curls a bit once it is cut.

Dobla la camiseta por la mitad de forma vertical y córtala a la medida que quieras, dependiendo de lo corto que quieres que quede el top. Ten en cuenta que el borde de la camiseta se enroscará un poco una vez cortado. 
DIY crop top
In a thin card (I used a box of cereal) draw the message and cut it out to create the template. Stick the template to the T- shirt with the masking tape. Inside the top place another card or newspaper to protect the other side of the garment from the paint. Use the colour paint you like (I mixed some navy, brown and white), gently press the sponge over the template to paint the message. Leave it dry for about an hour and then remove the masking tape and template.
En un cartón fino (yo usé el de una caja de cereales) dibuja el mensaje que quieres que tu top lleve y córtalo para crear la plantilla. Ajusta la plantilla al top con la cinta de carpintero. Coloca dentro del top otro cartón fino o periódico para proteger la parte de atrás de pintura, que suele traspasar. Usa el color de pintura que más te guste (yo he hecho una mezcla con azul marino, marrón y blanco), moja la esponja y ve presionando suavemente con ella sobre la plantilla, hasta que queden todas las letras completas. Deja secar durante una hora y retira la plantilla.
DIY crop top
Iron the message to fix the paint to the fabric with the heat. And now, we arrive to the step where there's the need of patience: sewing all the eads to the border of the letters. Use double thread in order to secure the pieces to the fabric. Once all the borders are filled with beads, that's it: you've finished.

Plancha el mensaje para que la pintura se fije a la tela con el calor. Y ahora toca la parte en donde hemos de sacar la paciencia: coser las bolitas alrededor de las letras. Usa hilo doble para que queden mejor fijadas al tejido. Una vez todas las letras están bordeadas por abalorios, ya está: has acabado.
DIY crop top crop top DIY

Do you like the result? Here you have the look with it.Now it's time to wear it :) I hope you're having a nice week!

¿Qué os parece el resultado? Aquí tenéis in look con este DIY, por si no o visteis en el post del lunes. Ahora toca salir a la calle a lucirlo :) Espero que esteis teniendo una muy buena semana.

Monday 1 July 2013

Smile

Happiness can be expressed in many different ways; a big smile is one of them. I'm in a very happy moment of my life; I've been living an amazing experience abroad that has enriched myself a lot. This adventure is coming to an end in about a week, but I want to believe that it has just been the beginning, that more good thing are about to happen. When doing this DIY T-shirt (Yes, I've done it and in next post you'll have the tutorial!) I wanted to transmit my happiness and also ask people to smile as well; everybody should smile at least once a day, even in those moments when we are not in the mood; it is very good for health.  

La felicidad puede ser expresada de distintas formas; una gran sonrisa es una de ellas. Estoy en un momento muy feliz de mi vida: he estado disfrutando de una magnífica experiencia en el extranjero que me ha hecho crecer muchísimo como persona. Esta aventura llega a su fin en alrededor de una semana, pero quiero creer que esto sólo ha sido el principio de muchas cosas buenas que están por llegar. Al hacer esta camiseta DIY (sí, la he hecho yo y en el próximo post tendréis el tutorial) quería reflejar ese senimiento de felicidad que tengo y animar a quien la lea a sonreír también. Todos deberíamos sonreír al menos una vez al día, incluso en esos momentos en los que no nos apetece; es muy bueno para la salud.

crop top DIY crop top DIY crop top DIY crop top DIY crop top DIY crop top DIY crop top DIY crop top DIY

Crop top: DIY
Jeans: Zara (old)
Zapatillas deportivas/Sneakers: Converse via Spartoo


Monday 25 March 2013

Blond gorilla

Con abril a punto de llegar, la nieve, una vez más, ha vuelto al Reino Unido. Menos mal que mis abrigos de pelo (falsos, por supuesto) hacen más llevadero el frío y me ayudan a salir a la calle sin temor a congelarme (además de las prendas termales que suelo ponerme debajo). Éste ha sido el último en llegar a mi armario, una mezcla entre el yeti y un gorila rubio; es muy calentito y suave, y además sienta de maravilla. ¿Os gusta?

April is arriving in few days and snow, once more, has come to the UK. Luckily, my fake fur coats are making it easier and I can go out with no worries about freezing. This one is the last in my closet, a mix between a yeti and a blond gorilla; it is very warm and stylish. Do you like it?
fur coat fur coat fur coat fur coat fur coat fur coat fur coat fur coat fur coat
Abrigo/Coat: Oasap
Camisa/Shirt: Romwe
Pantalones/Skinnies: Stradivarius
Botines/Boots: Mango
Gorro/Beanie: Even&Odd
Clutch: DIY Telva (tutorial aquí)