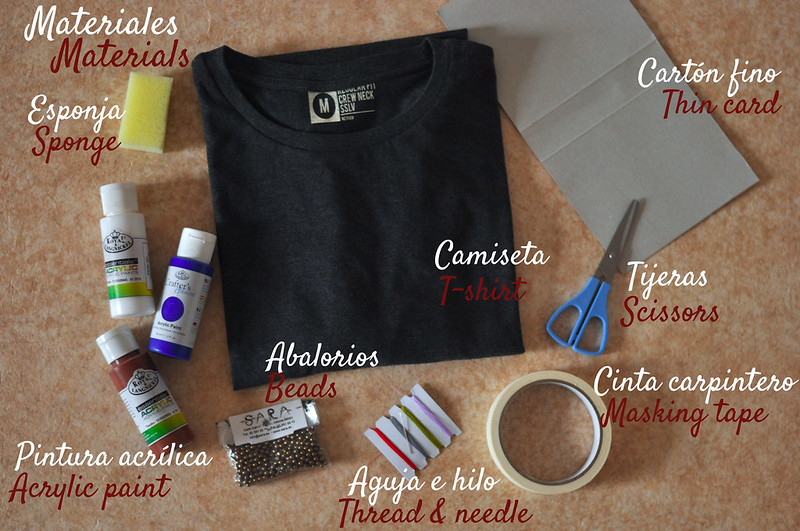
On Monday I showed you my DIY crop top on a look and today here you have the tutorial, step by step, to know how to do your own message crop top. I'm already thinking of new crop top designs for this summer; I'll show you if I finally decide on making them. The tutorial I am explaining to you today isn't difficult but it takes time, so you have to be very patient when doing it. Are you ready? Just follow the steps!
El lunes os enseñé en un look el crop top DIY que me he hecho y hoy os traigo el tutorial para que podáis haceros el vuestro. Ya estoy pensando en nuevos diseños de crop top para este verano, creo que va a ser una de esas prendas que voy a llevar mucho por lo cómodas que son y las posibilidades que dan. Os los enseñaré si el final me decido a hacerlos. El tutorial que os explico hoy no es nada difícil, pero requiere su tiempo así que se necesita paciencia. ¿Estáis listas? Simplemente hay que seguir los pasos.
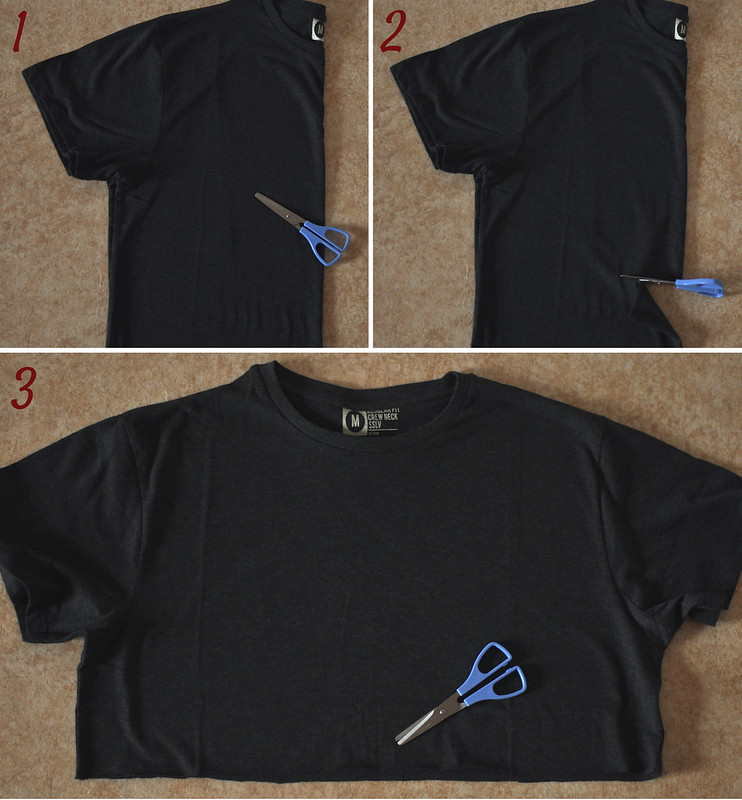
Fold the T-shirt vertically in a half and cut it straight as you like, depending how cropped you want it. Take into account that the border of the T-shirt curls a bit once it is cut.
Dobla la camiseta por la mitad de forma vertical y córtala a la medida que quieras, dependiendo de lo corto que quieres que quede el top. Ten en cuenta que el borde de la camiseta se enroscará un poco una vez cortado.
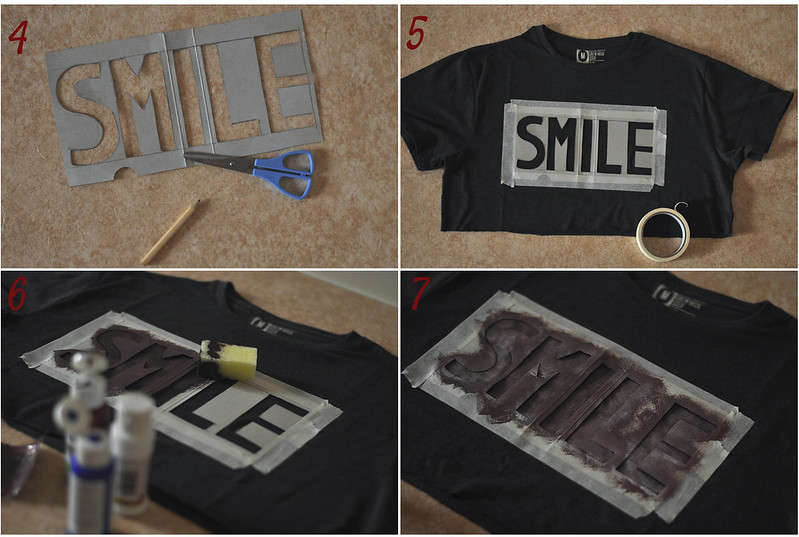
In a thin card (I used a box of cereal) draw the message and cut it out to create the template. Stick the template to the T- shirt with the masking tape. Inside the top place another card or newspaper to protect the other side of the garment from the paint. Use the colour paint you like (I mixed some navy, brown and white), gently press the sponge over the template to paint the message. Leave it dry for about an hour and then remove the masking tape and template.
En un cartón fino (yo usé el de una caja de cereales) dibuja el mensaje que quieres que tu top lleve y córtalo para crear la plantilla. Ajusta la plantilla al top con la cinta de carpintero. Coloca dentro del top otro cartón fino o periódico para proteger la parte de atrás de pintura, que suele traspasar. Usa el color de pintura que más te guste (yo he hecho una mezcla con azul marino, marrón y blanco), moja la esponja y ve presionando suavemente con ella sobre la plantilla, hasta que queden todas las letras completas. Deja secar durante una hora y retira la plantilla.
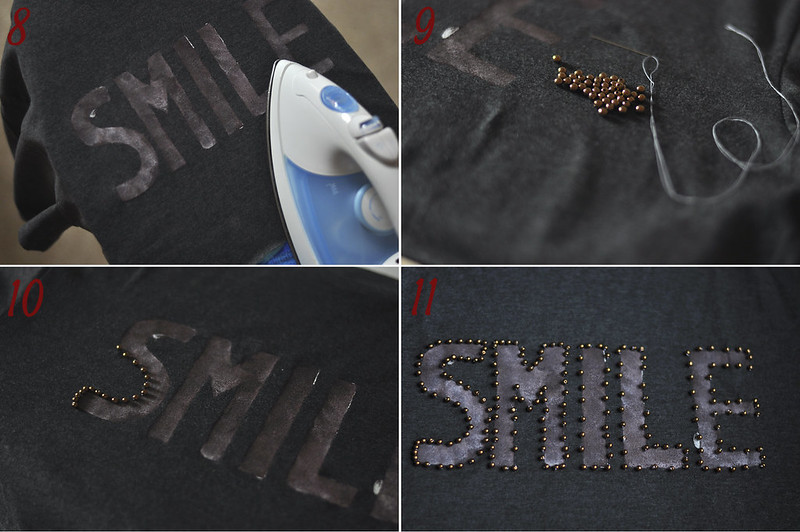
Iron the message to fix the paint to the fabric with the heat. And now, we arrive to the step where there's the need of patience: sewing all the eads to the border of the letters. Use double thread in order to secure the pieces to the fabric. Once all the borders are filled with beads, that's it: you've finished.
Plancha el mensaje para que la pintura se fije a la tela con el calor. Y ahora toca la parte en donde hemos de sacar la paciencia: coser las bolitas alrededor de las letras. Usa hilo doble para que queden mejor fijadas al tejido. Una vez todas las letras están bordeadas por abalorios, ya está: has acabado.
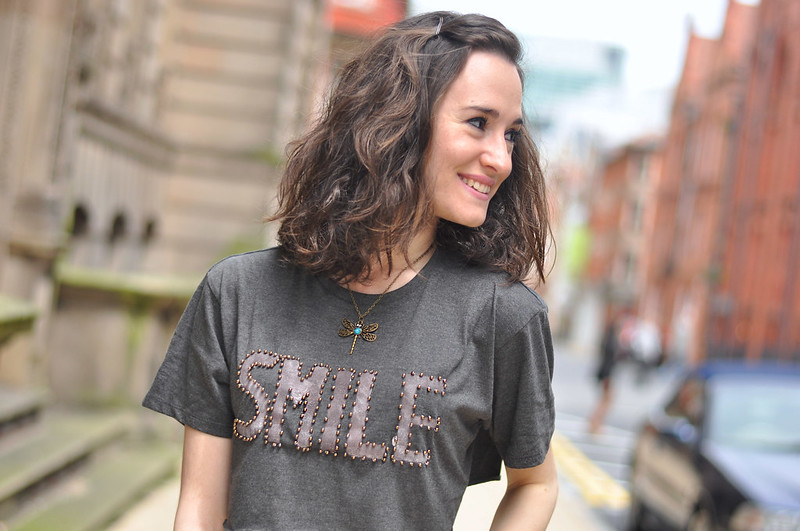
Do you like the result? Here you have the look with it.Now it's time to wear it :) I hope you're having a nice week!
¿Qué os parece el resultado? Aquí tenéis in look con este DIY, por si no o visteis en el post del lunes. Ahora toca salir a la calle a lucirlo :) Espero que esteis teniendo una muy buena semana.
39 comments
me encanta el resultado; queda muy bonito!
www.letiziabarcelona.com
artista!!
Qué artista! Quedó preciosa y nos encantan los looks con este tipo de prenda!
Hoy nuestra selección de collares y colgantes.
inatrendytown.blogspot.com
Anda que no mola el DIY!
Yo hoy llevo un crop top en el blog! Y ahora que lo pienso, es un DIY bastante fácil jaja ;)
Adorable!
Chulisimo!!
Besos.
Gemeladas
pero que manitas me encanta como te ha quedado.Un besazo
http://thedesire.es/
Ooohhh!! Te ha quedado genial :)
Gracias por tu bonito comentario preciosa!!
Un beso enorme
Super ideal!!besos
dezazu.blogspot.com.es
maadre mia!! eres la leche!! un 10
me encanta
besoossss
the result came out super cool! well done
www.thefashionfraction.com
www.thefashionfraction.com
you are so creative! Lovely DIY dear ^^
I'm holding an international giveaway on my blog, dear!
Win an item on you choice from Persunmall :D
I hope that you can join in too!
http://www.missoline.com/2013/07/giveaway-8-persunmall-x-miss-oline.html
Thank you very much !
Caroline
so cool, well done
Take a look at my blog: http://www.we-heart-fashion.com
Let's follow each other via bloglovin/facebook? Let me know
¡Muy chulo el DIY! Y que facilito, este fin de semana ya tengo algo en lo que entretenerme! Muchas gracias por compartirlo.
Besos
love your blog so much!
would you like to follow each other?
www.fashionshores.blogspot.com
Una idea genial y muy económica porque la puedo realizar con camisas básicas que ya no use. Besos desde http://remainsofsmoke.blogspot.com/ te sigo ya
Que artista!!!! me encanta la idea y el resultado! un beso
www.elvestidorabierto.blogspot.com
qué bien te ha quedado, artista!
besitos
Te ha quedado precioso, y el mensaje no puede ser más positivo jeje
Un beso!
Wow, que buen "DIY" !! Me encantó! :)
Pues si... muy chulo!!
Muak
Idea buena donde las haya!
me encanta!
besitos
Such a cool idea! Im' going to be trying something similar but for a clutch purse instead. :)
www.LateefAccessories.blogspot.com
genial diy!
ah qué chula la idea!!! me gusta un montón!
incluso con dibujos así más complicados e ir superponiendo los papeles, me parece genial :)
si encuentro mañanas libres en verano me voy a unir a tu plan de hacerme algún que otro crop top!
ah qué chula la idea!!! me gusta un montón!
incluso con dibujos así más complicados e ir superponiendo los papeles, me parece genial :)
si encuentro mañanas libres en verano me voy a unir a tu plan de hacerme algún que otro crop top!
Oh loved it!
http://colorsandthreads.blogspot.in/
Qué ideal! xx❤
eso si que es talento para diy! enhorabuena! haha
Such a great DIY - you made it look so easy!
Blog | Cocochic △
Bloglovin | http://www.bloglovin.com/blog/1823055/
Amazing post! xx
Uy!!! ésto se lo voy a hacer a una de mis amigas en una camiseta que la iba a regalar!!! Qué súper idea!!! Seguro que la encanta!! ^_^
Que lindo y divertido proyecto! Se me ocurren algunas ideas, gracias por los tips!
Cee. ♥
Code Overdressed
que bueno!!!! me ha encantado!!!
besos desde
http://elrincondemodadesila.blogspot.com.es
Great job darling! Thanks for visiting Infinite Style!
xoxo
Juliette Laura
http://juliettelaura.blogspot.com
www.etsy.com/shop/InfiniteStyleShop
Really cool <3
www.we-heart-fashion.com
New look on the blog!
xoxo
genial idea nena!
NEW OUTFIT IN THE BLOG! SPORTLY OR CASUAL?
http://showroomdegarde.blogspot.com.es/2013/07/sportly-or-casual.html
mola!!
xoxo
Love it!
http://fabuloustorture.com
Post a Comment